
DjangoでMySQLを利用するためのステップバイステップの手順を解説します。
DjangoはデフォルトのDBMSとしてSQLiteが設定されていますが、大規模なデータを扱うようなアプリケーションや、複数のプロセスから同時にアクセスするような状況では、パフォーマンスやデータ整合性の問題が生じる可能性があります。
一方、MySQLは大量のデータを扱うことができ、複数のユーザーからの同時アクセスに対応することができ、トランザクションをサポートしているため、データの整合性を保つことが可能。そのため、Djangoの開発では、SQLiteをそのまま利用するのではなくMySQLなどのデータベースを利用するのが一般的。
参考 トランザクションとは?
このページでは、以上のような背景を踏まえ、DjangoでMySQLを利用する方法を5つのステップに分けてわかりやすく解説します。
この解説は、既にVPS(CentOS)上にDjangoがインストールされている状況を想定しています。1から自分だけでDjango開発を行ってPythonの勉強をしたい方は以下の記事をご覧ください。

ステップ1:MySQLのインストール
それでは早速DjangoでMySQLを利用する方法を解説していきます。
まずはMySQLサーバをインストールします。以下のコマンドを実行。
sudo yum install mysql-server
このコマンドを実行すると、以下のような結果が返って来ますので「y」を入力。
ダウンロードサイズの合計: 21 M
インストール後のサイズ: 179 M
これでよろしいですか? [y/N]:
次に、MySQLサーバを起動します。
sudo systemctl start mysqld
MySQLが正常に起動したか確認するには、以下のコマンドを実行します。
sudo systemctl status mysqld
以下のような結果が返ってくればOK。正常に起動していることが確認できます。
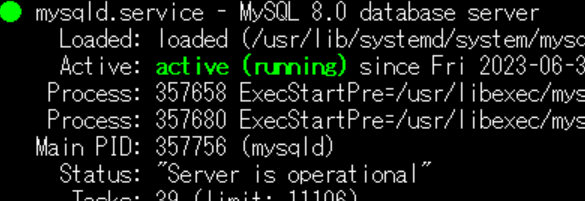
● mysqld.service - MySQL 8.0 database server
     Loaded: loaded (/usr/lib/systemd/system/mysqld.service; disabled; preset: disabled)
     Active: active (running) since Fri 2023-06-30 15:15:27 JST; 18s ago
    Process: 357658 ExecStartPre=/usr/libexec/mysql-check-socket (code=exited, status=0/SUCCESS)
    Process: 357680 ExecStartPre=/usr/libexec/mysql-prepare-db-dir mysqld.service (code=exited, status=0/SUCCESS)
   Main PID: 357756 (mysqld)
     Status: "Server is operational"
      Tasks: 39 (limit: 11106)
     Memory: 449.0M
        CPU: 3.592s
     CGroup: /system.slice/mysqld.service
             mq357756 /usr/libexec/mysqld --basedir=/usr
ステップ2:MySQLデータベースの作成
次に、Djangoで使用するためのデータベースを作成します。まず、MySQLのシェルにログインします。
mysql -u root -p
パスワードの入力が求められますが、今はまだパスワードを設定していないのでそのままEnterボタンを押下。
# mysql -u root -p
Enter password:
→このままEnterボタンを実行でログインできます。
ログインが完了すると以下のような結果が返って来ます。
Welcome to the MySQL monitor.  Commands end with ; or \g.
Your MySQL connection id is 8
Server version: 8.0.32 Source distribution

Copyright (c) 2000, 2023, Oracle and/or its affiliates.

Oracle is a registered trademark of Oracle Corporation and/or its
affiliates. Other names may be trademarks of their respective
owners.

Type 'help;' or '\h' for help. Type '\c' to clear the current input statement.
ログインしたら以下のコマンドを実行してデータベースを作成します。your_database_nameは、作成したいデータベース名に置き換えてください。
CREATE DATABASE your_database_name CHARACTER SET UTF8;

---結果---
mysql> CREATE DATABASE your_database_name CHARACTER SET UTF8;
Query OK, 1 row affected, 1 warning (0.02 sec)
MySQLユーザのパスワードの設定方法は以下のような流れで行われます。
まずは、以下のコマンドを実行してください。
sudo mysql_secure_installation
このコマンドを実行すると、セキュリティ設定を行うための対話型のスクリプトが起動します。スクリプトは以下の手順で進行します。
- パスワードの設定をするかどうかを尋ねられます。"Y"を入力してEnterキーを押します。
- 新しいパスワードを入力してください。適切なパスワードを入力し、Enterキーを押します。
- パスワードの強度を確認するために再度パスワードを入力します。同じパスワードを再入力し、Enterキーを押します。
- パスワードが正しく設定されたか確認されます。
- f匿名ユーザの削除、rootユーザのリモートログインの禁止、テストデータベースの削除を選択します。詳細は環境に合わせて選択してください。
上記の手順を実行すると、MySQLのパスワードが設定されます。再度ログインする際には、設定したパスワードを使用してログインしてください。
# sudo mysql_secure_installation

Securing the MySQL server deployment.

Connecting to MySQL using a blank password.

VALIDATE PASSWORD COMPONENT can be used to test passwords
and improve security. It checks the strength of password
and allows the users to set only those passwords which are
secure enough. Would you like to setup VALIDATE PASSWORD component?

Press y|Y for Yes, any other key for No: y

There are three levels of password validation policy:

LOW    Length >= 8
MEDIUM Length >= 8, numeric, mixed case, and special characters
STRONG Length >= 8, numeric, mixed case, special characters and dictionary                  file

Please enter 0 = LOW, 1 = MEDIUM and 2 = STRONG: 0
Please set the password for root here.

New password:

Re-enter new password:

Estimated strength of the password: 50
Do you wish to continue with the password provided?(Press y|Y for Yes, any other key for No) : y
By default, a MySQL installation has an anonymous user,
allowing anyone to log into MySQL without having to have
a user account created for them. This is intended only for
testing, and to make the installation go a bit smoother.
You should remove them before moving into a production
environment.

Remove anonymous users? (Press y|Y for Yes, any other key for No) : n

 ... skipping.


Normally, root should only be allowed to connect from
'localhost'. This ensures that someone cannot guess at
the root password from the network.

Disallow root login remotely? (Press y|Y for Yes, any other key for No) : n

 ... skipping.
By default, MySQL comes with a database named 'test' that
anyone can access. This is also intended only for testing,
and should be removed before moving into a production
environment.


Remove test database and access to it? (Press y|Y for Yes, any other key for No) : n

 ... skipping.
Reloading the privilege tables will ensure that all changes
made so far will take effect immediately.

Reload privilege tables now? (Press y|Y for Yes, any other key for No) : n

 ... skipping.
All done!
ステップ3:MySQLユーザーの作成と権限の付与
MySQLへのログインが成功したら、Djangoからデータベースにアクセスするためのユーザーを作成し、権限を付与します。
以下のコマンドを実行してください。your_usernameとyour_passwordは、作成したいユーザー名とパスワードに置き換えてください。
CREATE USER 'your_username'@'localhost' IDENTIFIED BY 'your_password';

-----
Query OK, 0 rows affected (0.01 sec)
作成したユーザーに対して、先ほど作成したデータベースへの全権限を付与します。
GRANT ALL PRIVILEGES ON your_database_name.* TO 'your_username'@'localhost';

-----
Query OK, 0 rows affected (0.01 sec)
変更を有効にするために、最後に以下のコマンドを実行します。
FLUSH PRIVILEGES;
これでMySQLの設定は完了です。MySQLのシェルを終了します。
exit;
ステップ4:DjangoでMySQLを使うための設定
Django側でMySQLを使えるように設定します。まず、DjangoがMySQLを使うために必要なパッケージをインストールします。以下のコマンドを実行してください。
pip install mysqlclient
次に、Djangoの設定ファイルであるsettings.pyを開き、データベースの設定を以下のように変更します。適切なデータベース名、ユーザー名、パスワードに置き換えてください。
DATABASES = {
    'default': {
        'ENGINE': 'django.db.backends.mysql',
        'NAME': 'your_database_name',
        'USER': 'your_username',
        'PASSWORD': 'your_password',
        'HOST': 'localhost',
        'PORT': '3306',
    }
}
以上で、DjangoとMySQLの設定は完了です。
ステップ5:データベースのマイグレーション
最後に、Djangoのマイグレーションを実行して、データベースのセットアップを完了します。以下のコマンドを実行してください。
python manage.py migrate
このコマンドにより、DjangoのデータベーススキーマがMySQLに適用されます。
以上で、DjangoでMySQLを利用する設定が完了しました。これにより、Djangoで作成したWebアプリケーションでMySQLデータベースを利用することができます。